
How to Remove Swirl Marks and Light Scratches From Car Paint

Swirl marks are fine scratches that show up as very fine lines or even what looks like a spider web when the hood of a car is in direct sunlight. These kinds of scratches are the vast majority of scratches that are made by the owner of a car. When dirt is on a car and is wiped by a dry towel swirl marks are made. Brush car washes and washing a car with dirty mitts also make swirl marks by scratching the grit into the clear coat of a car. The good news is that most swirl marks are in the clear coat of a car and can be polished out with very minimal effort. Many swirl marks can even be polished out by a novice polisher at home with a little practice.
Big mistakes to fix: Using a lot of abrasives such as compound with a rotary to scrape paint off edges, and “correcting” fine swirls with glazes that get washed off in a month. True correction is to bring a surface to be perfect and then to buff it to a high gloss with the correct pads, products, and machines – all the while removing the least amount of paint possible.
Step-by-step: Removing Swirl Marks
- Wash and clay first. It’s no good polishing a dirty car as it’s likely to have already been scratched by the dirt or grime. First wash the car thoroughly using two buckets of soapy water and then using a clay bar remove any tar, bugs etc. from the surface of the car leaving it glass smooth for polishing.
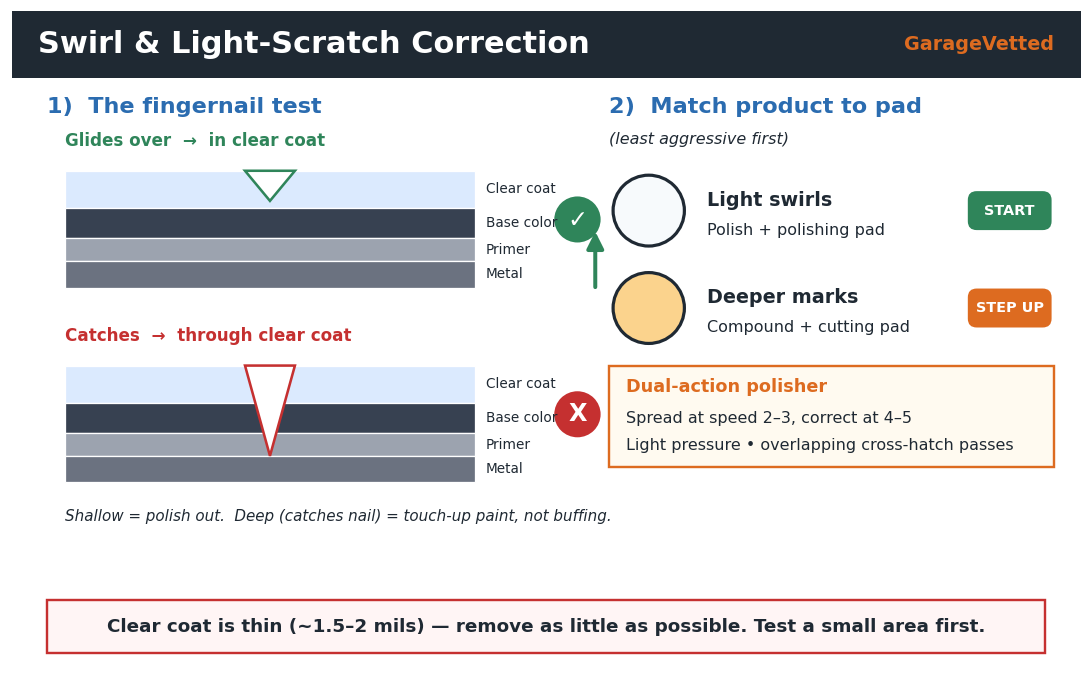
- Check the depth of your scratch (Fingernail test). Use your fingernail to very lightly rub the worst part of the scratch. If your fingernail glides easily across the scratch then it is confined to the clear coat and can be polished out. If your fingernail catches in the scratch then you have penetrated the clear coat and will need to use touch up paint – do not attempt to buff the scratch out. Examine the scratch in bright light (a very bright LED light held at the correct angle will highlight swirls etc in scratches).
- Least Aggressive First. Use the least aggressive product (polish/ polisher) to tackle the smallest problems (swirl marks) and the most aggressive (compounds/ cutting pads) for the biggest problems (scratches/ marks). Test a small area first and see if you need to do the whole panel.
- Dual-Action (DA) Polisher – For the New Car Detailer. These polishers are perfect for the new car detailer. The dual-action polishers will not burn the paint as a rotary will. For the polish apply 3–4 pea sized drops to the polish applicator pad. Open up the paint by spreading the polish out at a low speed (about 2–3). Once you have opened up the paint work the polish out at a speed of 4–5 using light even pressure. Work out the polish in a slow and overlapping cross hatch pattern scratches in the paint going left to right then up and down over a 2’x2 section of paint.
- Wipe and inspect– Wipe residue off with clean microfiber and inspect. May need to do again to ensure all residue removed.
- Seal the correction. Once you have polished the paint and exposed it to air, it will start to dry out within days. Therefore, it is very important to apply a sealant or a spray ceramic as soon as possible.
Safety tips: tape off plastic trim (polish stains it) and be gentle near panel edges, where clear coat is thinnest. Keep the pad flat and never let the machine dwell spinning in one spot.
Pro Tips
- “Least aggressive that gets the job done” is the detailer’s golden rule — you can always step up, but you can’t put clear coat back.
- Factory clear coat is thin (~1.5–2 mils). Most cars only tolerate two or three full corrections in their lifetime, so don’t compound every year.
- Keep several clean pads and swap them out — a product-clogged pad stops cutting and starts marring.
- For beginners, an all-in-one “scratch & swirl remover” that cuts and then finishes in one step is the safest single product to start with.
Common Problems & Fixes
- Swirls reappear after a few washes → you filled them with a glaze instead of correcting them, or bad wash technique is re-introducing them. Fix the wash habits first.
- Hazing / micro-marring after polishing → pad was too aggressive or the product dried out. Refine with a finishing polish and a soft pad.
- Buffer bounces or jumps → too much pressure or speed. Ease off and keep the pad flat.
- Scratch won’t disappear → it’s below the clear coat. Switch to touch-up paint; more polishing only thins the surrounding clear.
Related on GarageVetted
- How to Detail Your Car at Home Like a Pro (Step-by-Step)
- How to Clean Car Upholstery and Carpets (Stains, Odors, and Pet Hair)
Because you can only remove so much clear coat safely, always start with the least aggressive polish and step up only if the swirl marks remain. Work a small section under good light, wipe, and re-check — chasing deep scratches too hard is how you burn through paint. A dual-action polisher makes it easier to remove swirl marks evenly than by hand. For paint and coating chemical-safety basics, see epa.gov.
Related reviews
11.1V vs 14.8V Jump Starters: What Really Determines Starting Power?
Peak amps dominate jump starter advertising, but that headline number does not tell you how well a portable booster will…
What PSI Should Car Tires Be? The Right Pressure for Every Vehicle
What PSI Should Car Tires Be? The Right Pressure for Every Vehicle What PSI should car tires be? For most…
Can You Overinflate a Tire? Max PSI vs Recommended PSI, Explained
Can You Overinflate a Tire? Max PSI vs Recommended PSI, Explained Can you overinflate a tire? Yes — easily, and…